

四角形を少しづつ小さくしていくパターンです。
基本的な図形で面白みがないような気がしますが、色をつけたり線に変化をつけたりすると美しいパターンができます。
2
3
4
5
6
7
8
9
10
11
12
13
14
15
%%BoundingBox: 0 0 240 240
%%Title:ボックスパターン
/w 120 def % 四角形のサイズ
120 120 translate % 座標の原点を中央に移動
newpath % パスの初期化
25 { % 25回{ }内を繰り返す
w neg w moveto % 四角形
w neg w neg lineto
w w neg lineto
w w lineto
closepath
stroke % 描画する
/w w 5 sub def % 四角形のサイズから5を引く
} repeat

上の図形に色をつけます。
初期設定の色値から少しづつ数値を足したり引いたりして、色を変化させます。
2
3
4
5
6
7
8
9
10
11
12
13
14
15
16
17
18
19
20
21
22
%%BoundingBox: 0 0 240 240
%%Title:ボックスパターン
/w 120 def % 四角形のサイズ
/rc 1 def % R色
/gc 0 def % G色
/bc .7 def % B色
120 120 translate % 座標の原点を中央に移動
newpath % パスの初期化
25 { % 25回{ }内を繰り返す
w neg w moveto % 四角形
w neg w neg lineto
w w neg lineto
w w lineto
closepath
rc gc bc setrgbcolor % 色設定
fill % 塗りつぶす
/w w 5 sub def % 四角形のサイズから5を引き小さくしていく
/rc rc .05 sub def % R色から.05引く
/gc gc .05 add def % G色に.05足す
/bc bc .015 add def % B色に.015足す
} repeat
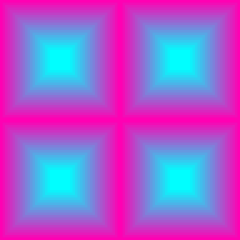
次に上記のパターンをプロシージャにして、画面内に4個配置します。
scaleで図形を1/2にし、translateで四隅に配置します。
この時グラフィックス状態を保存しておかないと次に描く図形に影響を与えます。
例えば図形の1/2が次は1/4、1/8になってしまいます。
また図形を描く前に四角形のサイズや色などを初期設定に戻さないと、前の図形の数値が使われて思わぬ結果になります。ここではinitプロシージャに初期設定をまとめています。
2
3
4
5
6
7
8
9
10
11
12
13
14
15
16
17
18
19
20
21
22
23
24
25
26
27
28
29
30
31
32
33
34
35
36
%%BoundingBox: 0 0 240 240
%%Title:ボックスパターン
/init { % 初期設定
/w 120 def % 四角形のサイズ
/rc 1 def % R色
/gc 0 def % G色
/bc .7 def % B色
} def
/box {
25 { % 25回{ }内を繰り返す
w neg w moveto % 四角形を引く
w neg w neg lineto
w w neg lineto
w w lineto
closepath
rc gc bc setrgbcolor % 色設定
fill % 塗りつぶす
/w w 5 sub def % 四角形のサイズから5を引き小さくしていく
/rc rc .05 sub def % R色から.05引く
/gc gc .05 add def % G色に.05足す
/bc bc .015 add def % B色に.015足す
} repeat
} def
120 120 translate % 座標の原点を中央に移動
gsave % グラフィックス状態を保存
% 初期化/座標を1/2に/座標を四隅に移動/boxプロシージャを実行
init .5 dup scale w neg w translate box
grestore % グラフィックス状態を復元
gsave init .5 dup scale w w translate box
grestore
gsave init .5 dup scale w neg w neg translate box
grestore
init .5 dup scale w w neg translate box
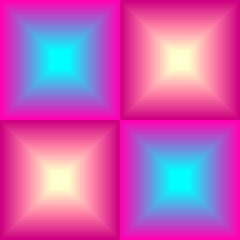
同じ色では面白くないので色を2パターンにします。
2
3
4
5
6
7
8
9
10
11
12
13
14
15
16
17
18
19
20
21
22
23
24
25
26
27
28
29
30
31
32
33
34
35
36
37
38
39
40
41
42
43
44
45
46
47
48
49
50
51
52
%%BoundingBox: 0 0 240 240
%%Title:ボックスパターン
/init { % 初期設定
/w 120 def % 四角形のサイズ
} def
/c1 {
/rc 1 def % R色
/gc 0 def % G色
/bc .7 def % B色
/sw 1 def % 色の変え方スイッチ
} def
/c2 {
/rc .8 def % R色
/gc 0 def % G色
/bc .5 def % B色
/sw -1 def % 色の変え方スイッチ
} def
/box {
25 { % 25回{ }内を繰り返す
w neg w moveto % 四角形を引く
w neg w neg lineto
w w neg lineto
w w lineto
closepath
rc gc bc setrgbcolor % 色設定
fill % 塗りつぶす
/w w 5 sub def % 四角形のサイズから5を引き小さくしていく
sw 1 eq { % 色の変え方
/rc rc .05 sub def % R色から.05引く
/gc gc .05 add def % G色に.05足す
/bc bc .015 add def % B色に.015足す
} {
/rc rc .02 add def % R色から.02足す
/gc gc .05 add def % G色に.05足す
/bc bc .015 add def % B色に.015足す
} ifelse
} repeat
} def
120 120 translate % 座標の原点を中央に移動
gsave % グラフィックス状態を保存
% 初期化/c1色/座標を1/2に/座標を四隅に移動/boxプロシージャを実行
init c1 .5 dup scale w neg w translate box
grestore % グラフィックス状態を復元
save init c2 .5 dup scale w w translate box
grestore
gsave init c2 .5 dup scale w neg w neg translate box
grestore
init c1 .5 dup scale w w neg translate box
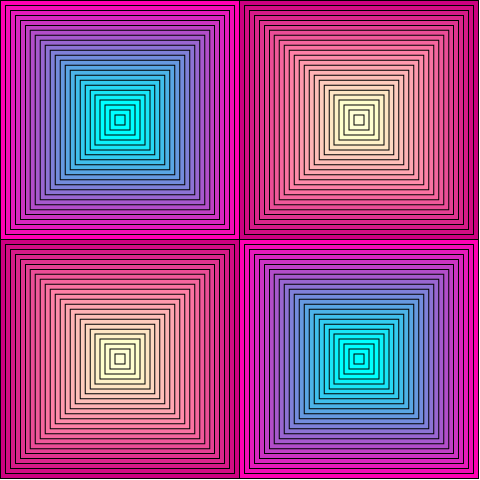
線をつけてみます。
コードが長くなるので、変更部分前後を掲載します。
2
3
4
5
6
7
8
9
10
11
12
13
25 { % 25回{ }内を繰り返す
略
closepath
gsave % グラフィックス状態を保存
rc gc bc setrgbcolor % 色設定
fill % 塗りつぶす
grestore % グラフィックス状態を復元
0 0 0 setrgbcolor % 黒
stroke % 線を描画
/w w 5 sub def % 四角形のサイズから5を引き小さくしていく
略
} def
コメント